As their name implies, binders glue the other elements of a plaster together. More than anything else the binder defines the properties of a plaster including strength, permeability, and resistance to weathering. Over thousands of years of natural plastering there are three major binders that have been traditionally used: clay, gypsum, and lime. There’s a lot of variation within all three. Lime in particular is further categorized into hydrated lime, natural hydraulic lime, and natural cement; all of which have very distinct properties and are considered as unique binders. But for simplicity let’s look at the properties and origins of the three major binders first, and then break them down into further categories.The table below summarizes some of the properties of the trinity of natural binders, as well as portland cement and a portland-lime blend (recognizing that portland cement is not a natural plaster, but has been used in natural building).
| Binder | Vapour Permeability (US Perm/inch) | Weathering Resistance | Strength | Embodied energy |
| Clay | Excellent (18) | Poor | Weak | Low |
| Gypsum | Excellent (18) | Very poor | Weak | Low-Medium |
| Lime | Good (14) | Good | Strong | Medium |
| Cement-Lime | Poor (7-10) | Very good | Strong but brittle | High |
| Cement | Very Poor (1) | Very good | Strong but brittle | Very High |
Source: Henry and Therrien 2018. Essential Natural Plasters
Now let’s look at each binder more closely.
Clay
Clay is usually considered to be the most ecological of all binders, because it can be dug from the ground and used as-is; or even when it is mined and sold industrially, the energy cost of processing it is typically lower than other binders, which are mined and then heated to relatively high temperatures to achieve their binding properties. Clay plasters, or earth plasters, are the most vapour permeable of all the natural plasters, and the most flexible – they readily allow humidity to pass through, and adapt to movements of the substrate without cracking. These properties are important when plastering over natural wall systems. Clay also has the interesting property of readily taking in water, but when it is saturated it becomes rather waterproof and prevents further water penetration. However earth plasters trade these virtues for lower strength and erosion resistance – wet clay may be water proof, but under driving rain it will erode relatively quickly. Clay also has very high shrinkage as it dries, so earth plasters are either applied very thin, or contain large amounts of fiber and/or aggregate.
Clay is the product of many thousands of years of erosion of rocks (particularly feldspar), and the deposition of very fine particles, often on ancient lakebeds. Sometimes clay deposits are formed at or near the source rocks, and are relatively pure – these are called primary clays. More often they are transported by water and deposited far away on the beds of ancient lakes, where they are typically a blend of many minerals – these are called secondary clays. Clay is primarily composed of the mineral kaolinite (Al2O3•2SiO2•2H2O) but with widely varying quantities of aluminates and silicates, as well as oxides of iron, calcium, magnesium and many other compounds / impurities. But this doesn’t tell us much about what clay actually is – which is incredibly fine particles that are typically flattened into miniature platelets. It is the interaction of these platelets that gives clay its properties.
The platelets are easily lubricated with a layer of water, so that they stick together very strongly, and yet readily slide over each other – making clay extremely plastic and malleable when wet, yet quite hard when it dries out and this lubricating layer is gone. Clays vary in the size of their particles, and generally clays with very fine particle sizes have high plasticity, and high strength because the clay has a lot of binding power. Unfortunately this goes hand in hand with higher rates of shrinkage. The most extreme example of this is bentonite clay, which has such fine particle size that it behaves quite differently than other clay. Bentonite is typically 10 times finer than any other clay; it can have a surface area of almost 1000 square meters per gram. The very high rates of shrinkage, high plasticity, and extremely low permeability generally make bentonite totally unusable in natural plasters.
On the other hand if you’re using pottery clay, you’ll probably want to use some of the most plastic pottery clays, the ball clays, which are fantastic for mixing with lots of aggregate and fiber to make a strong base coat that can be laid quite thick on the wall. Kaolin clays, which are much less plastic, are often used in thin finish plasters for their desirable white colour and very low silica content – it’s very important to realize that most clay contains significant amounts of silica, so the dust is no safer to breathe than portland cement dust. Clays that lack plasticity (called short clays) will tend to break rather than bending when wet, and generally speaking are less desirable for plaster (but this rule is often broken). When you’re using clays dug up on site, however, they are rarely so pure – your biggest concern will be ratio of clay to non-clay elements in the soil
If you’re looking for recipes for clay plasters, you’ll want to get this book
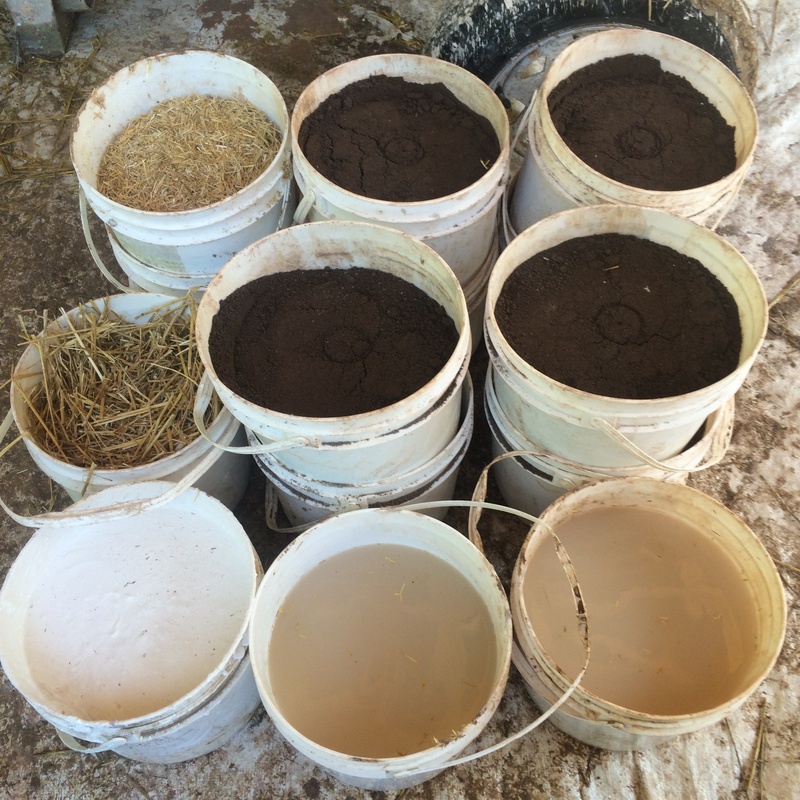
Evaluating soil types
The most important property of your soil, when assessing it for plaster, is the clay content. Ideally soils used in earth plasters should contain 20-30% clay or more. It may be possible to make a good plaster with as little as 10-20% clay content in your soil, but proceed with caution, particularly at the lower end, because your plaster will be weaker. Particles that are slightly large than clay are called silt, which is often mistaken for clay because it has the same slippery feel when wet – however it lacks the binding properties. Silt can be either benign or very harmful in plaster, depending on how much there is. As a rule It should equal less than 1/4 of the clay content of your soil, so if your clay content is 20% the maximum amount of silt should be 5%; any more than this and there’s a chance of plaster failure. Plasterers will certainly break this rule, but be careful and make a lot of samples You should aim to use the best soil possible for your plaster, even if it means trucking it in or using bagged clay- plastering a house costs thousands of dollars, so if you’re going to experiment, do it on a shed.
There are several ways to test your soil, you should use all of them and compare the results. You may want to compare soil from a few different places on your site, as it can sometimes vary over short distances.
The ribbon testMake a ball of clay that is malleable and not-too-wet, not-too-dry; squeeze it between thumb and forefinger to produce a ribbon about 1/8 inch (2-3 mm) thick and less than ½ inch (about 1 cm) wide. Keep pushing the ribbon out to see how long you can extend it before it breaks. A minimum of 1 ½ inches (40 cm) usually indicates at least 20% clay, but to be safe it would be good to have a ribbon double that length. Evaluate the feel as you squeeze it: does it feel smooth and plastic, can you feel sand grains in it? Is the sand fine or coarse, sharp or rounded? Next do the jar test to get even more detailed information about your soil.
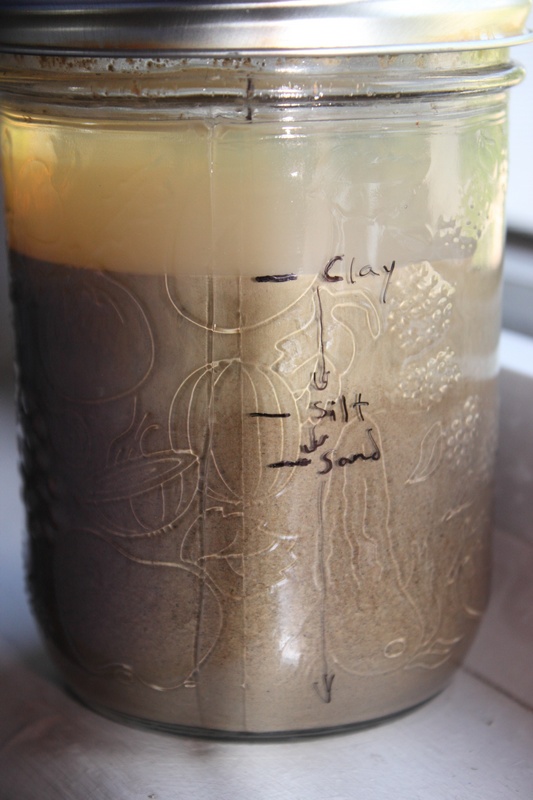
The jar test
The jar test is a fairly accurate and easy way to determine your soil type, but it takes time because clay can take up to a week to settle out of suspension. Any jar will work for this test, but a 1 litre mason jar is a nice size. Fill the jar no more than 1/3 full with soil, then top it up to at least ¾ full with water (leave enough air space to get a good shake). Optionally you can add some detergent or salt to help disperse the clay particles. Shake the jar well, until you feel that any soil clumps have broken up. If not using a dispersant, you’ll likely want to let it soak for a day or more, and come back to shake it again. Note that it should be shaken, not stirred; swirling will tend to throw off the accuracy slightly. Have a timer (with an alarm) and a permanent marker handy. Shake for several minutes; start the timer when you stop shaking. After 40 seconds all of the sand component of the soil will have settled out – mark this level on the side of the jar. After 1-2 hours all of the silt will have settled out, mark another line at this level. Wait until the water starts to look clear (up to a week), at which point all, or nearly all of the clay will have settled out. Measure the height of each layer and divide it by the total height to obtain a percentage by volume of the soil. The measurement of clay will be a little high, because clay continues to compact over time, and even more so when it dries. For more accuracy you may carefully scoop off most of the remaining water and leave the jar to evaporate in the sun for a few days. For some soils the jar test works very well, for others it can still be tricky to tell the silt and clay apart. Use all three tests, and then see how it works in test batches of plaster.
Processing site soil for use in a plaster can be stickier than you might think – we describe one method in detail in our last blog post and we describe several methods in our book Essential Natural Plasters.
Clay plasters are fun, but because of the varying properties of soil, fiber and aggregate it can feel more like art than science. Very clay-rich soils can often be treated in a recipe as though they are pure clay, even though they may contain 10-20% or more of sand and silt – site clays often have more binding power than many pottery clays (ball clays being the exception). Different regions can also have very different clay soils, which makes knowledge sharing a little more complicated. Always do tests!
Gypsum
Gypsum is one of the oldest plasters, and because it can be cooked as low as 350 degrees Fahrenheit to create a binder, it is in fact among the most ecological. Gypsum is a soft, fairly common mineral that is formed when sulphuric acid (typically from volcanoes) reacts with limestone. It is carried in solution and deposited in layers on sea-beds, and over time it forms into a soft stone which we now mine.
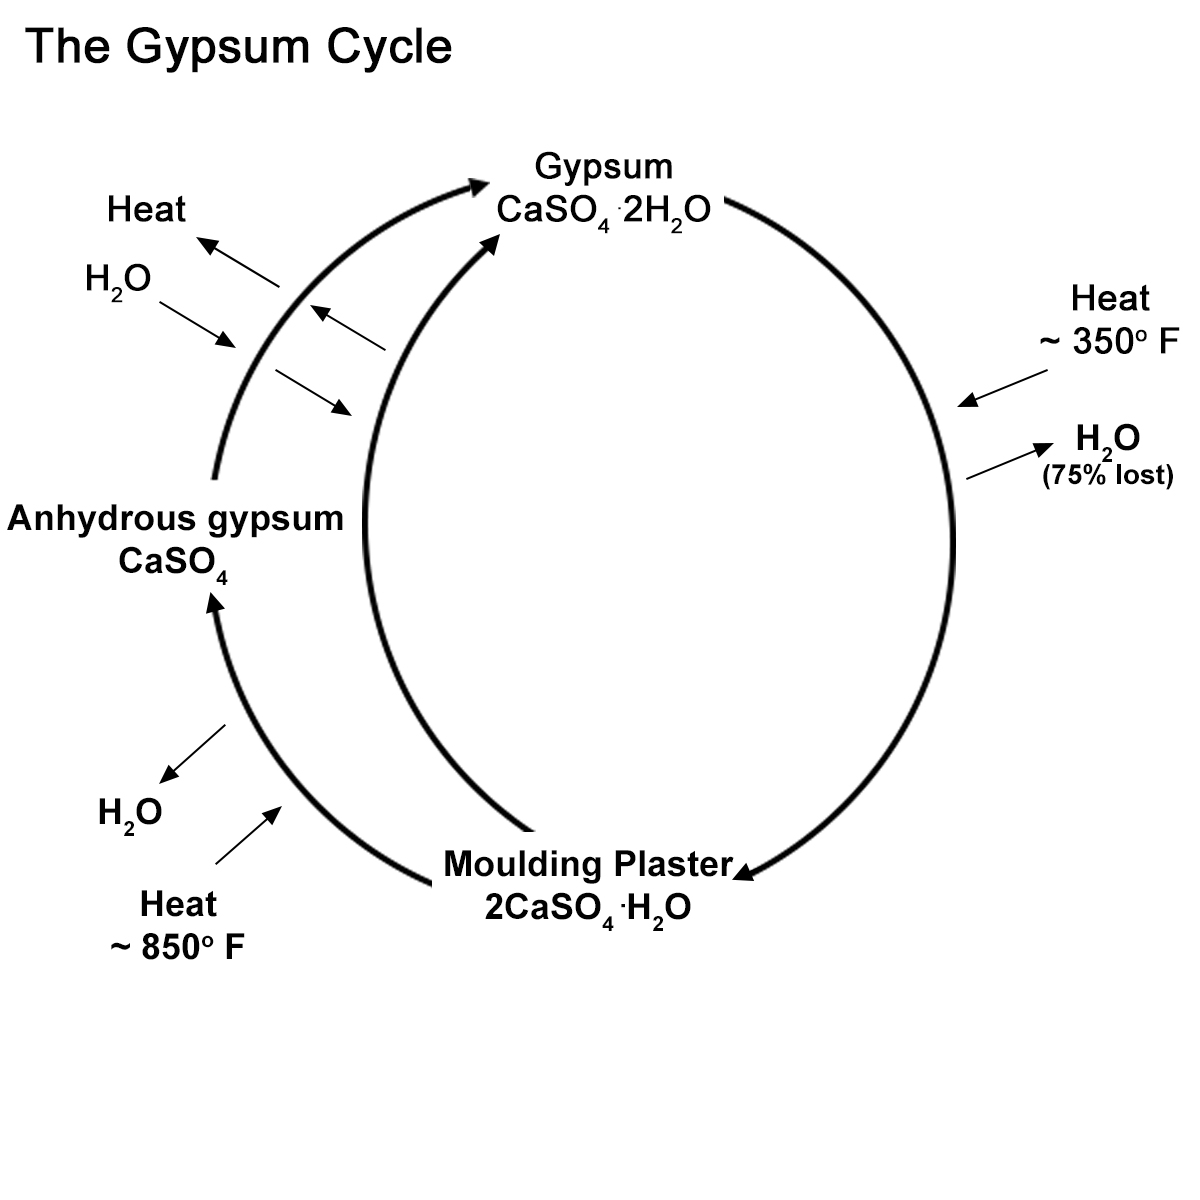
Chemically gypsum is hydrous calcium sulphate (CaSO4·2H2O), but when cooked at temperatures you would use to cook a casserole, three-quarters of the chemically bound water is driven off, forming 2CaSO4.H2O, which is moulding plaster (plaster of Paris), or gauging plaster – the latter is chemically identical, but is ground coarser to slow the set time. This is the most common form of gypsum plaster, and really the only one that is readily available in North America – and it cannot be used where there is any exposure to weather or moisture.
However if gypsum is cooked at 850 degrees Fahrenheit the remaining water is driven off and anhydrous gypsum (CaSO4) is created, which makes a very strong plaster that sets relatively slowly. Anhydrous gypsum, also called dead-burnt gypsum, can be used as an exterior plaster that lasts over 100 years, and historically it was fairly commonly used in France and Belgium.
In North America gypsum is hardly used by natural builders, however it could certainly play a greater role as an interior plaster, either on its own or mixed into earth or lime plasters. The unique properties of gypsum are very fast set time (tens of minutes to hours), and that it swells rather than shrinking as it cures. It can therefore speed up the set time of plasters, and reduce cracking, and it can be used with or without the addition of sand or fiber. Gypsum plasters also have relatively high permeability, though not as good as earth plasters. While many drywall products contain gypsum, pure gypsum plasters may need to be ordered as a specialty item, and will be sold as moulding plaster (very fast set) or gauging plaster (slower set).
Many drywall muds are best avoided, as they commonly contain toxic compounds – drywall products with a set time are usually more natural than those without. Joint compound that hardens by drying (rather than setting) contains no gypsum, and is typically rather synthetic. Drywall itself is arguably much less ecological than most gypsum plasters, because the gypsum used to manufacture drywall is usually a by-product of pollution control on coal-fired power plants. A great deal of energy is used to process this manufactured gypsum, and furthermore it may contain heavy metals or other toxins. Recycled, as well as toxin-cleaning drywall panels are available.
Both drywall and gypsum plaster have a strong fire-retardant effect because they release steam when heated, and can play an important role as a fire break (even more so than other natural plasters).
Lime
Lime has been used in construction for at least 9,000 years. The earliest known uses of burnt lime is in floors and plasters in the middle east; subsequently it was widely used in Greek and Roman architecture.
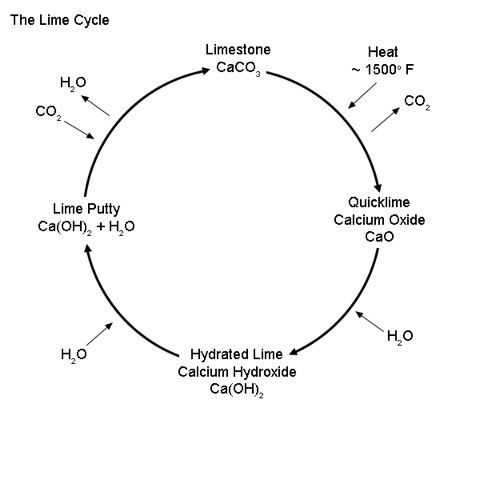
Today it is the most important of the natural binders for its balance of weather resistance, permeability, strength and flexibility. Lime is arguably the most perfectly balanced of the natural plasters, and it also works well in combination with the other binders. Lime is manufactured from limestone, which is sedimentary stone created from the skeletal remains of marine organisms – simply put, from seashells accumulating and compacting over geologic time. Limestone, which has the chemical formula CaCO3, is heated in lime kilns to at least 900 degrees Celsius (1500 degrees Fahrenheit), which drives off CO2 and leaves behind highly reactive calcium oxide (CaO), or quicklime. This in turn reacts rather violently with water to form hydrated lime (Ca(OH)2), which can be either dry hydrate or lime putty, and is what we use for plastering. It gets a little more complicated because impurities in limestone can dramatically change the properties of lime used in plastering. These changes can sometimes be quite useful because they create hydraulic limes and natural cements – but more on that later.
As we mentioned, lime is a well-balanced binder. Its permeability is less than clay, but still good enough to work well with natural buildings. It is relatively strong, but still flexible enough to move with natural buildings and have fairly low cracking. The biggest downside is that it can be finicky to work with – it likes weather that is “not too hot, not too cold, but just right.” It also needs to be protected from sun and wind, and regularly misted after application for a week or more.
Hydrated lime should dry slowly over a period of days, and then it will benefit from numerous wetting and drying cycles in the following weeks, because it requires a combination of both moisture and carbon dioxide from the air in order to cure. Although it’s rare, overzealous wetting of lime plaster such that it never dries out in the first few weeks can slow carbonation and be harmful. Much more common is allowing lime plasters to dry too quickly, which also interrupts carbonation and leaves the plaster weak and chalky when carbonation does occur.
When limestone that contains impurities is burned to create lime, natural hydraulic lime (NHL) may be created. The impurities react with the lime and give it a hydraulic set, meaning it will start to set as soon as water is added even in the absence of air (hydrated lime by contrast can be mixed into a putty that will store indefinitely if it is covered with water). The advantages of the set are that natural hydraulic lime (NHL) cures in days instead of weeks, and the resulting plaster is a little harder and less porous, and can withstand freezing much sooner.
NHL 2, 3.5 or 5 are available, with NHL 5 being the most hydraulic (reactive with water), NHL 2 the least. The main disadvantages of hydraulic set are somewhat lower vapour permeability, and also the plaster is less workable (it is not as sticky or creamy as hydrated lime – this is especially noticeable with NHL 5). Also cost – NHL is often imported from Europe. That can be a deal breaker for natural builders who believe in using local materials, but if it means breaking away from Portland cement (for late season plastering for example) that’s a big plus.
When natural hydraulic lime is hard to get locally, it can be created by adding impurities to hydrated lime. These are called pozzolans, and commonly include brick dust or other fired clay, or certain types of ash (especially volcanic ash).
Lime plasters in general tend to be somewhat porous, letting moisture in but also impeding its release more than earth plasters would. Vapour permeable paints or other sealants can be important over lime plasters, especially on fairly exposed sites. Lime also needs to be applied in relatively thin layers (3/8 inch is safe) so it may take three or more layers to level some straw bale walls.
If you’re looking for recipes for lime plasters you’ll want to get our book.
Cement
Finally there’s cement, which is a dirty word in natural building circles. Natural cement occurs as a result of very specific (aluminate) impurities in lime – on the other hand, Portland cement is an artificially created cement. Natural cement can be used almost interchangeably with Portland, except that it has a very quick set time, which can be partially managed using retardants. Portland cement has higher embodied energy, contains more toxins than natural cement, but is nevertheless more widely used in plastering natural buildings because of its low cost, availability, and controlled set time. When we talk about cement, we therefore are usually referring to Portland even though it is manufactured in a way that excludes it from being a “natural” plaster.
Cement plasters are very strong, but prone to cracking, and they have low permeability. Pure Portland cement has such low permeability that it virtually guarantees rot in natural materials that it is bonded to – but when mixed at least 1:1 with lime to make a cement-lime binder, it can have limited applications in natural building, though this is controversial. On natural buildings I would almost always recommend pure lime-sand plasters over cement-lime-sand plasters. For one thing, lime has much lower cracking, therefore less maintenance and less potential for water to enter your walls. If you’re considering using portland, the minimum amount of lime is 1 lime:1 portland: 6 sand, the maximum amount of lime is 2 lime: 1 portland: 9 sand (see Building with Lime: a Practical Introduction p.121 and Essential Natural Plasters)
And Finally
Now go read Patrick Webb’s essay about blending natural binders. Special thanks to Patrick for some of the information, especially on gypsum.
To learn more about natural plasters buy our book Essential Natural Plasters which has a lot of info about materials, techniques, and many recipes for natural plasters.